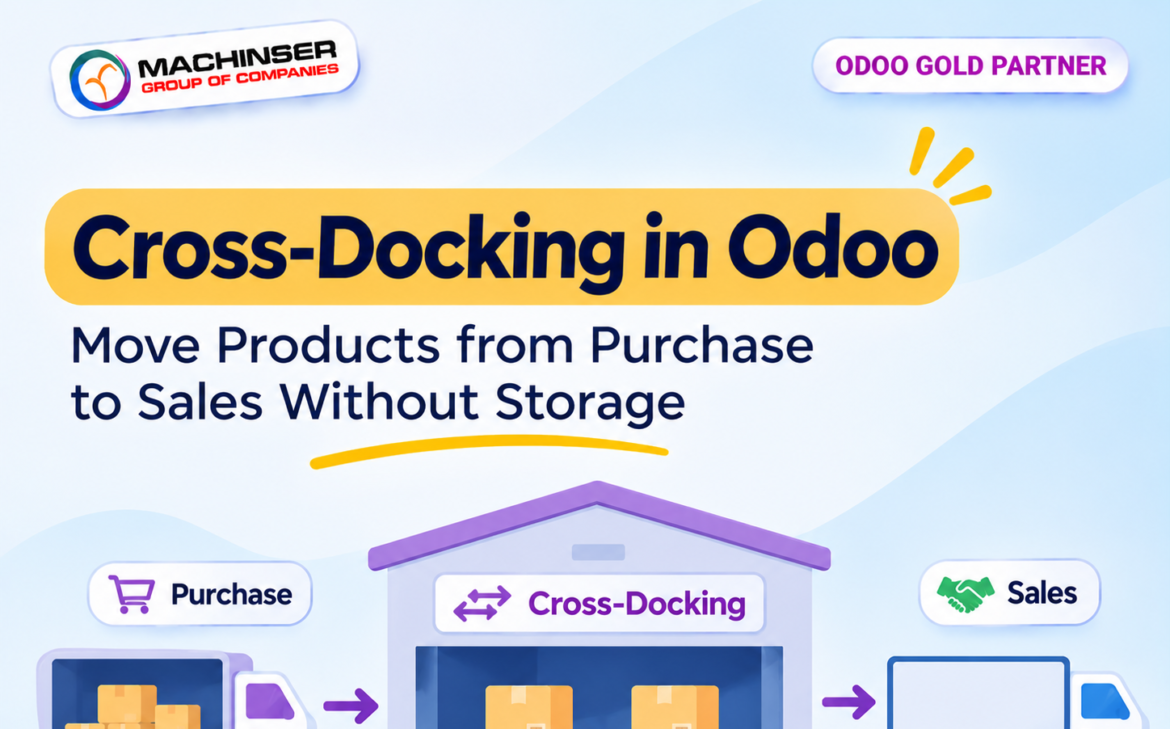
What if products arriving from a supplier could be directed towards an existing customer order without first being put away in the main warehouse? That is the idea behind cross-docking.
Cross-docking is a warehouse approach in which goods move from an inbound receiving area to an outbound dispatch area, with little or no long-term storage in between. It can help distributors, retailers and wholesalers reduce unnecessary put-away and retrieval work when incoming goods are already needed for outgoing orders.
What Is Cross-Docking?
Cross-docking is a warehouse management strategy in which incoming products are transferred directly to an outgoing shipment without being placed into long-term warehouse storage.
In a traditional warehouse workflow, products usually follow this process:
Supplier -> Input Area -> Warehouse storage -> Picking and dispatch -> Customer
With cross-docking, products move through a shorter route:
Supplier -> Input Area -> Dispatch/Output area -> Customer
Why Do Businesses Use Cross-Docking?
Cross-docking is particularly useful for businesses that handle high volumes of incoming and outgoing products.
Some important benefits include:
-
Reduced storage requirements: Products do not need to remain in warehouse storage unnecessarily.
-
Faster order fulfilment: Products can move towards dispatch as soon as they are received.
-
Lower handling effort: Fewer storage and retrieval operations may be required.
-
Improved warehouse efficiency: Receiving and dispatch activities can be coordinated around customer demand.
-
Better inventory movement: Products can move through the warehouse with less delay.
Real-world business example
Consider a supermarket distribution company supplying several retail outlets.
A supplier delivers 500 cartons of beverages to its distribution centre. Different retail outlets have already placed orders for those products.
Instead of storing all 500 cartons on warehouse shelves, the company can organise the incoming products according to the customer orders and transfer them to the dispatch area.
This allows the distribution centre to process outgoing orders more quickly.
Cross-docking is commonly considered in:
-
Retail and supermarket distribution
-
FMCG businesses
-
Food and beverage distribution
-
Import and export operations
-
High-volume wholesale businesses
1. Enable Storage Locations and Multi-Step Routes
Start by opening Inventory → Configuration → Settings. In the Warehouse section, enable Storage Locations and Multi-Step Routes, then save the settings. These features allow Odoo to manage stock in separate warehouse locations and use routes to coordinate transfers.
 Figure 1. Enable Storage Locations and Multi-Step Routes in Inventory settings.
2. Configure the Warehouse Receipt and Delivery Steps
Open Inventory → Configuration → Warehouses and select the warehouse. In the Warehouse Configuration tab, set the incoming and outgoing shipment flows to use two steps:
- Incoming Shipments: Receive then Store (2 steps).
- Outgoing Shipments: Pick then Deliver (2 steps).
This configuration provides the Input and Output stages used by the example. The screenshots show the warehouse set to receive products into Input before storage and to pick products into Output before delivery.
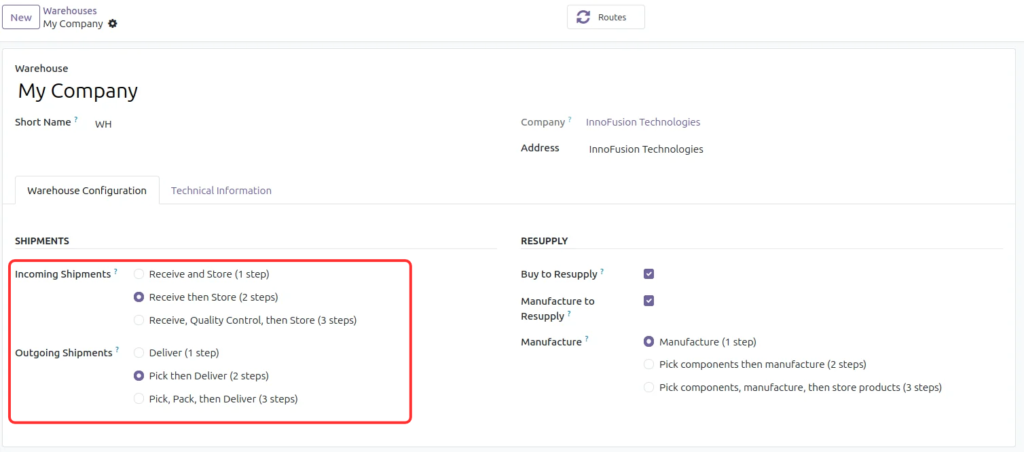 Figure 2. Set incoming shipments to Receive then Store and outgoing shipments to Pick then Deliver.
3. Create or Review the Cross-Dock Route
Go to Inventory → Configuration → Routes. The example database contains a route named Cross-Dock. Open it to review its applicability and rules.
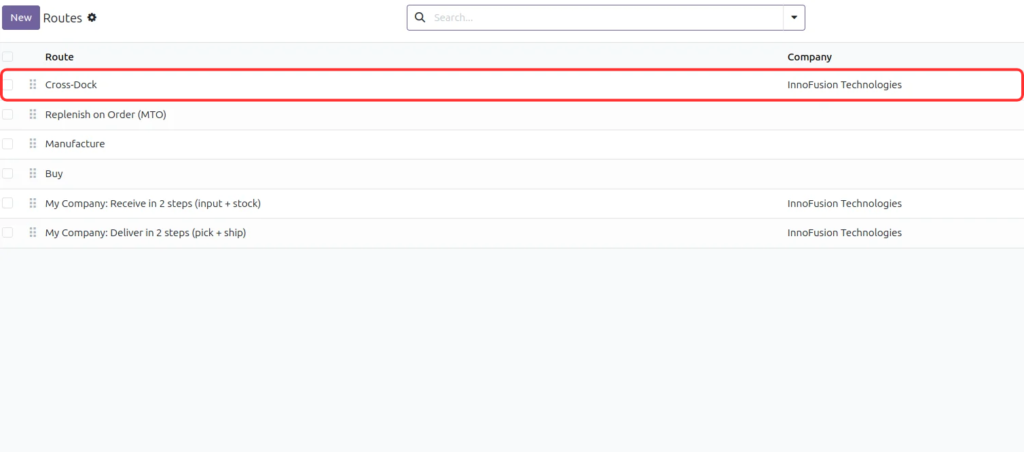 Figure 3. Locate the Cross-Dock route in the Routes list.
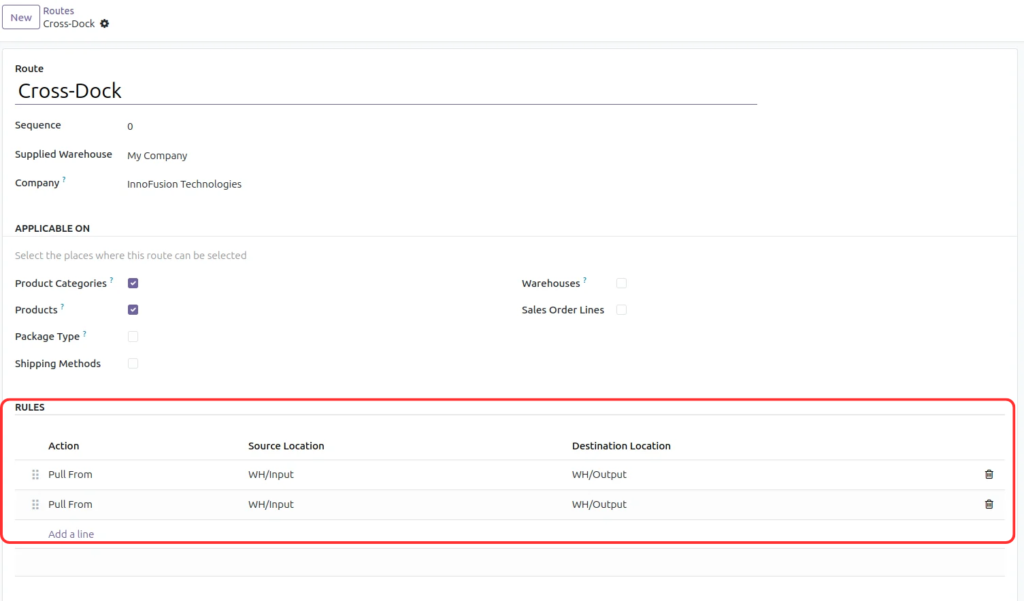 Figure 4. Review the Cross-Dock route and its configured stock rules.
The route in the example is applicable to products and product categories. Its rules use the Pull From action to move products from WH/Input to WH/Output. The screenshots show two entries for this same source and destination; before reproducing the setup in another database, review the rules already present and avoid creating duplicate rules.
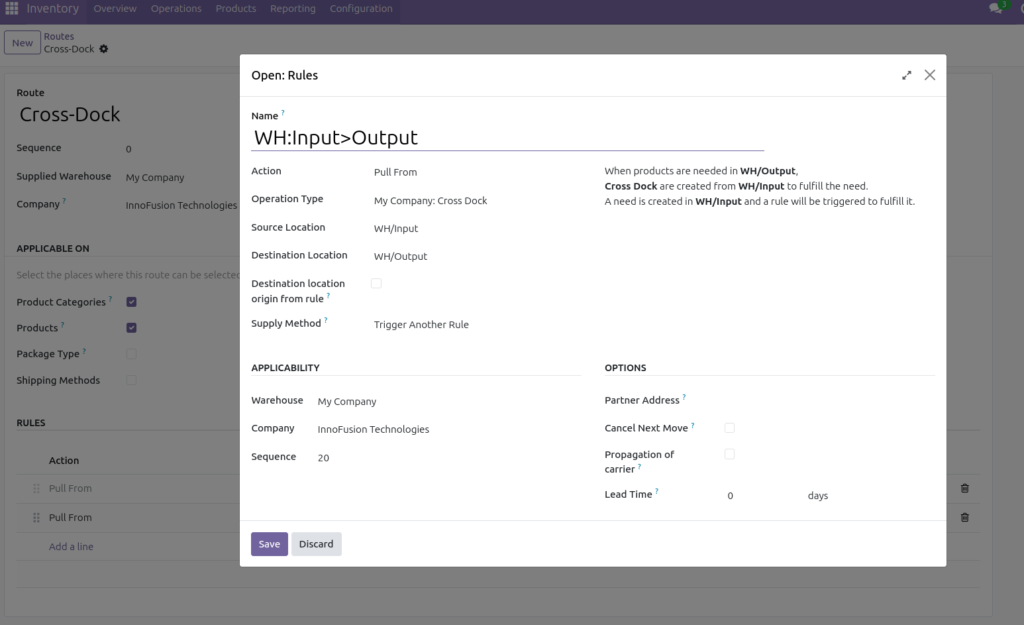 Figure 5. Inspect the WH:Input → Output rule and its Cross Dock operation type.
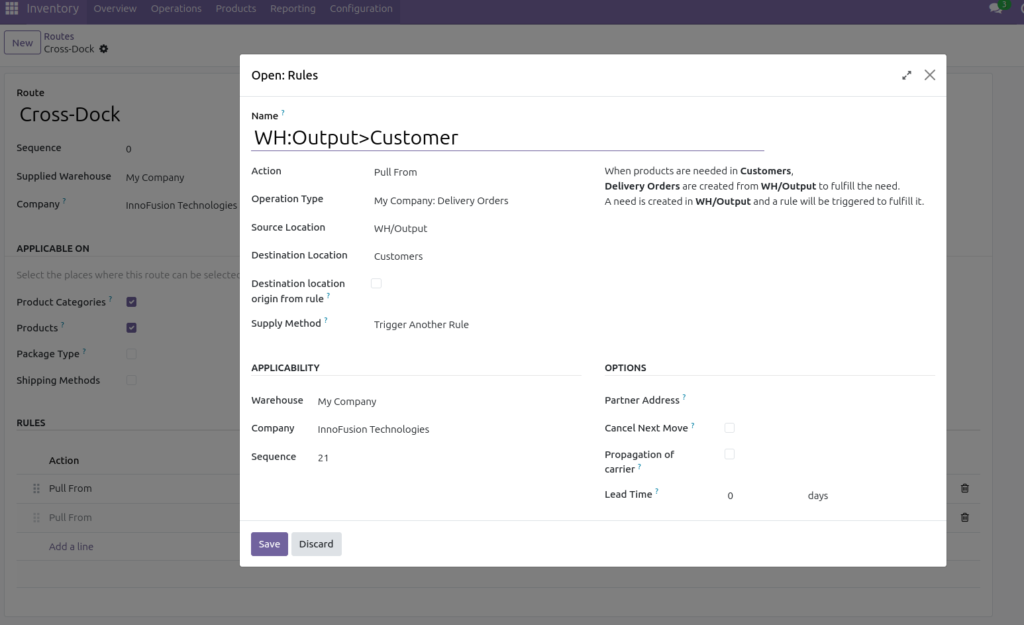 Figure 6. Inspect the WH:Output → Customer delivery rule.
4. Assign the Cross-Dock Route to the Product
Open the product record and go to its Inventory tab. Under Operations → Routes, select Cross-Dock and Buy. The screenshot also shows Replenish on Order (MTO) selected for this product. In this example, Buy is used to source the product from a vendor, while Cross-Dock defines the intended warehouse movement.
The exact route combination should match the replenishment policy and rules in your own database. Confirm that the product has a vendor configured on its Purchase tab before testing the purchase flow.
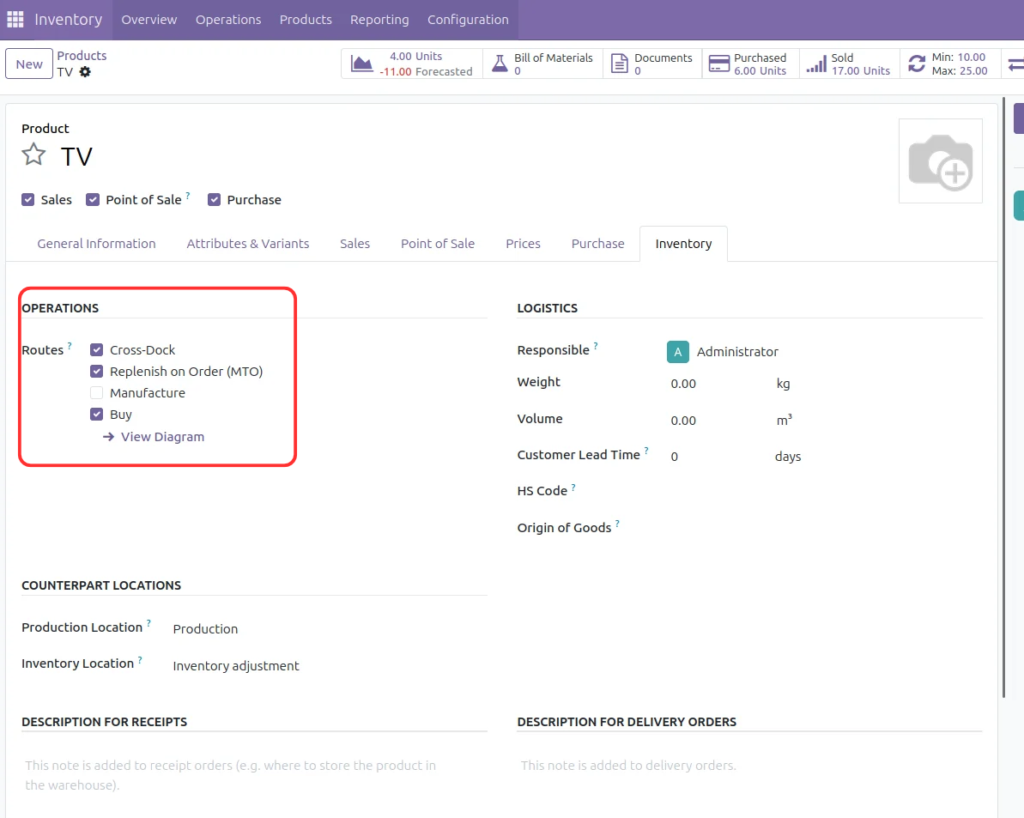 Figure 7. Select Cross-Dock and Buy on the product’s Inventory tab.
5. Create and Confirm a Sales Order
Create a quotation for the customer and add the product. In this example, the customer orders one TV. Confirm the quotation to create the Sales Order.
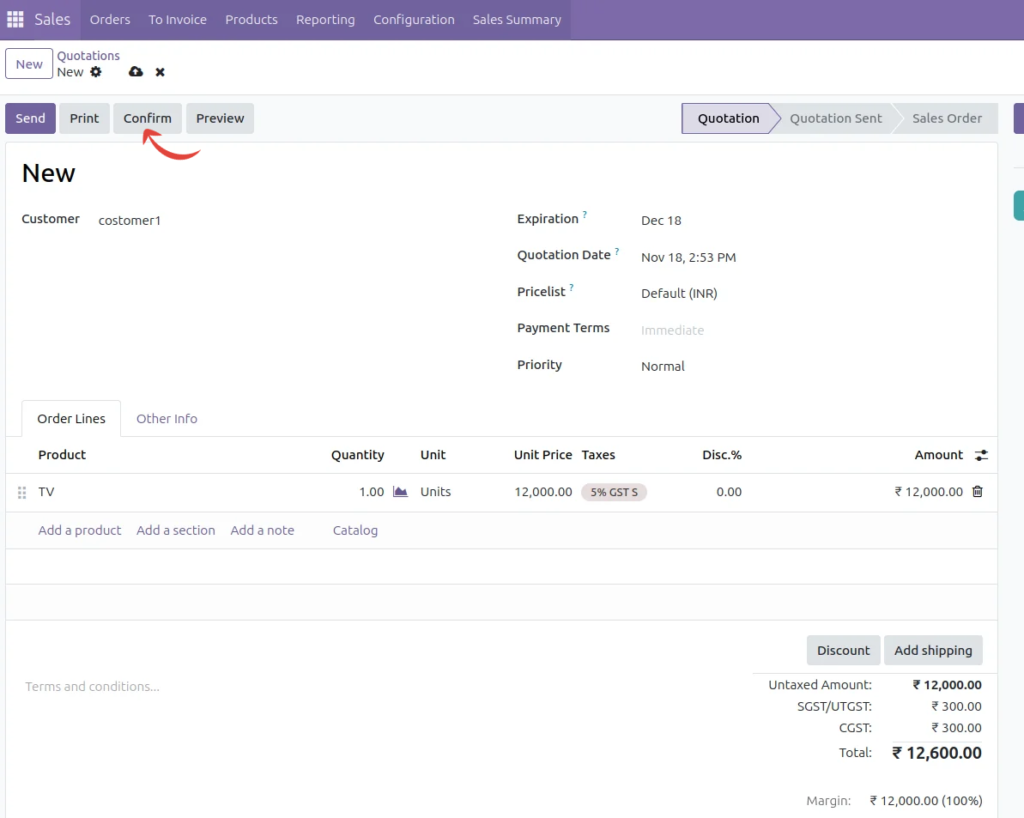 Figure 8. Create a quotation for the customer and add the TV product. Confirm the quotation to create the Sales Order.
 Figure 9. Cross Dock transfer are waiting for the the incoming shipments from purchase order
After confirmation, open the Sales Order. Its smart buttons provide access to the related delivery and purchase documents generated by the configured routes.
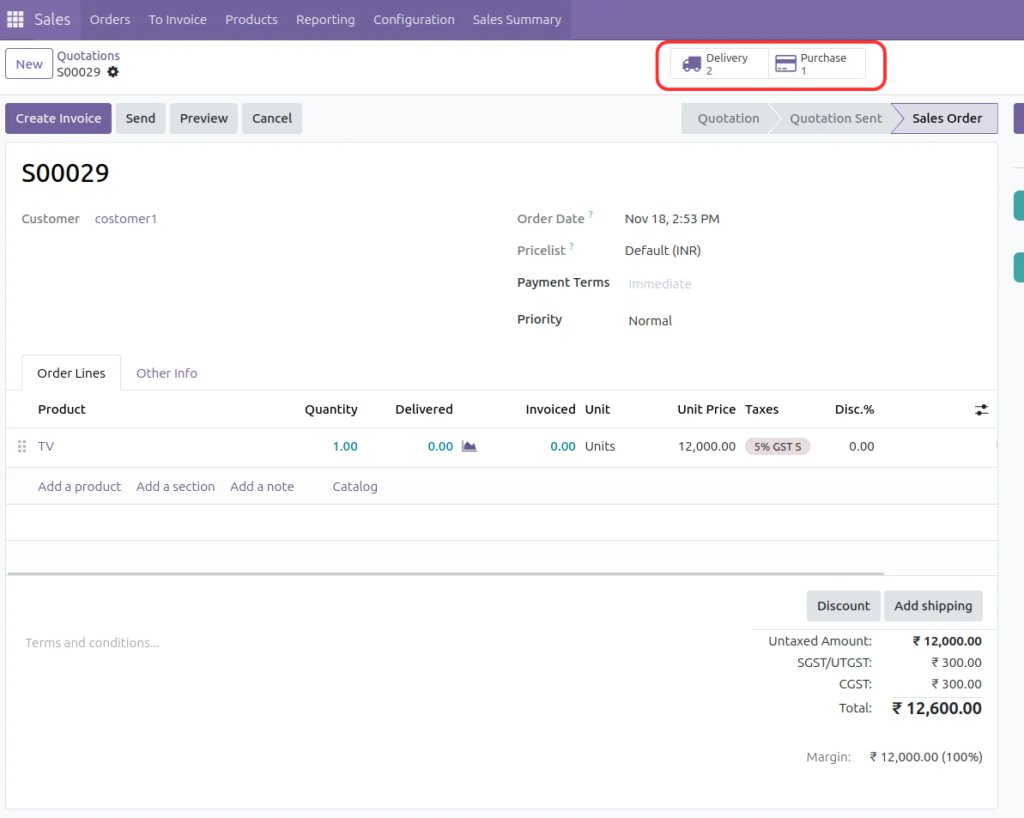 Figure 10. Use the Sales Order smart buttons to review the related delivery and purchase documents.
6. Process the Purchase Order
The Buy route creates a replenishment requirement that is handled through purchasing. Open the generated Request for Quotation, review the vendor and product quantity, and confirm the order.
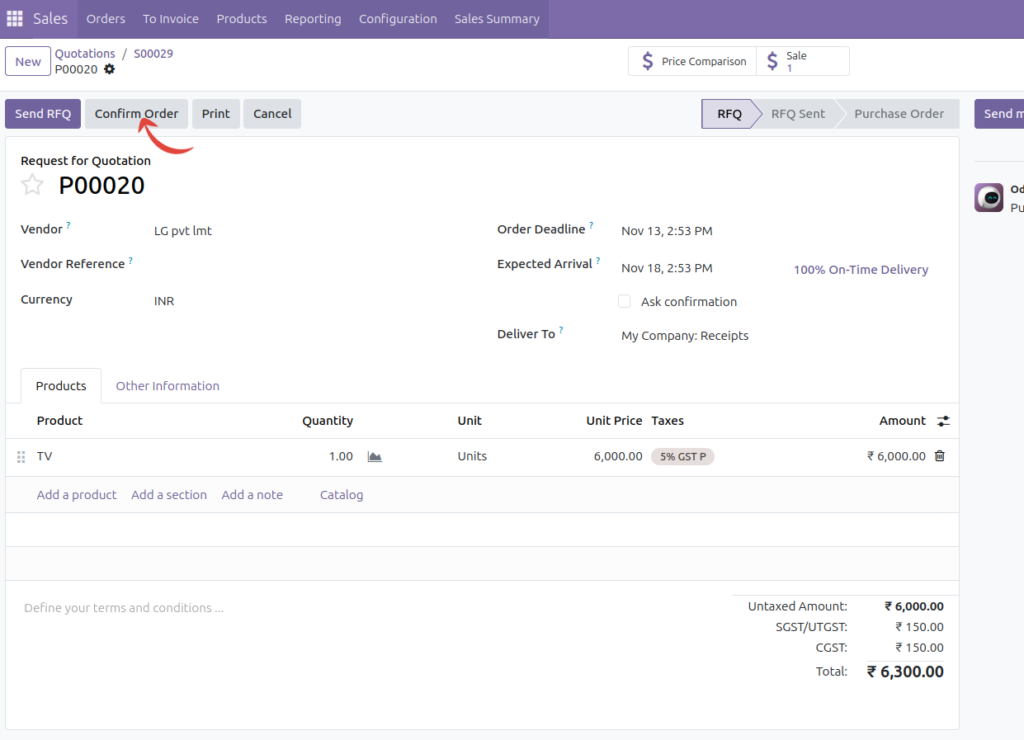 Figure 11. Review the generated RFQ and confirm the purchase order.
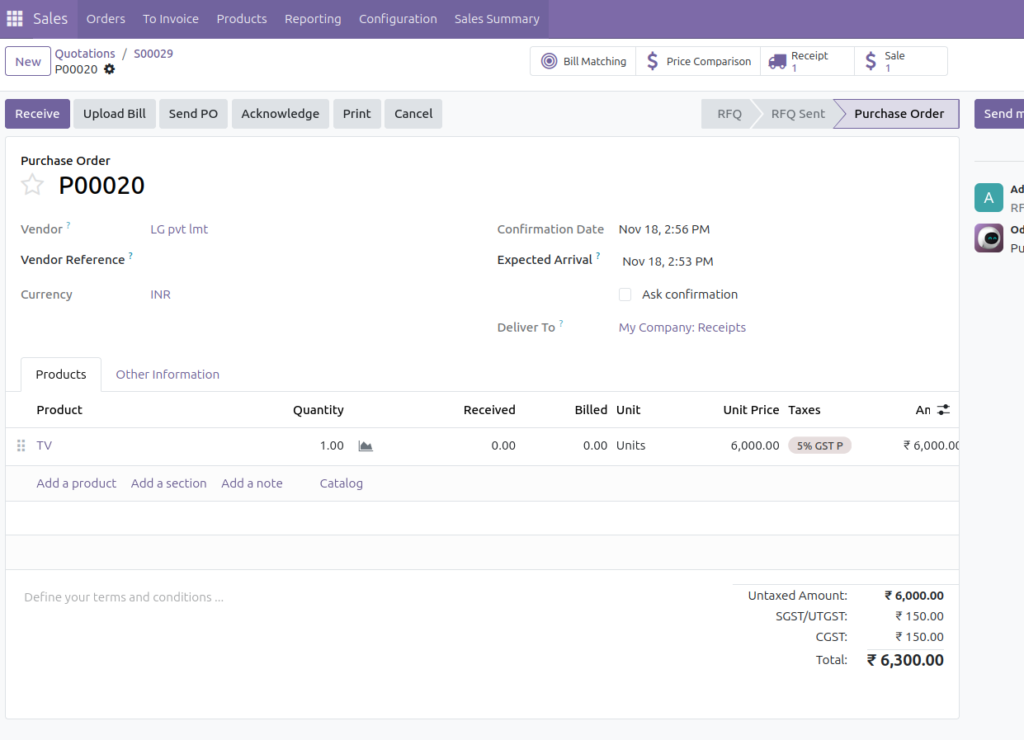 Figure 12. Review the confirmed Purchase Order and its receipt destination.
7. Receive the Products into WH/Input
Open the receipt linked to the Purchase Order. The destination location shown in the example is WH/Input. Check the product and received quantity, then validate the receipt.
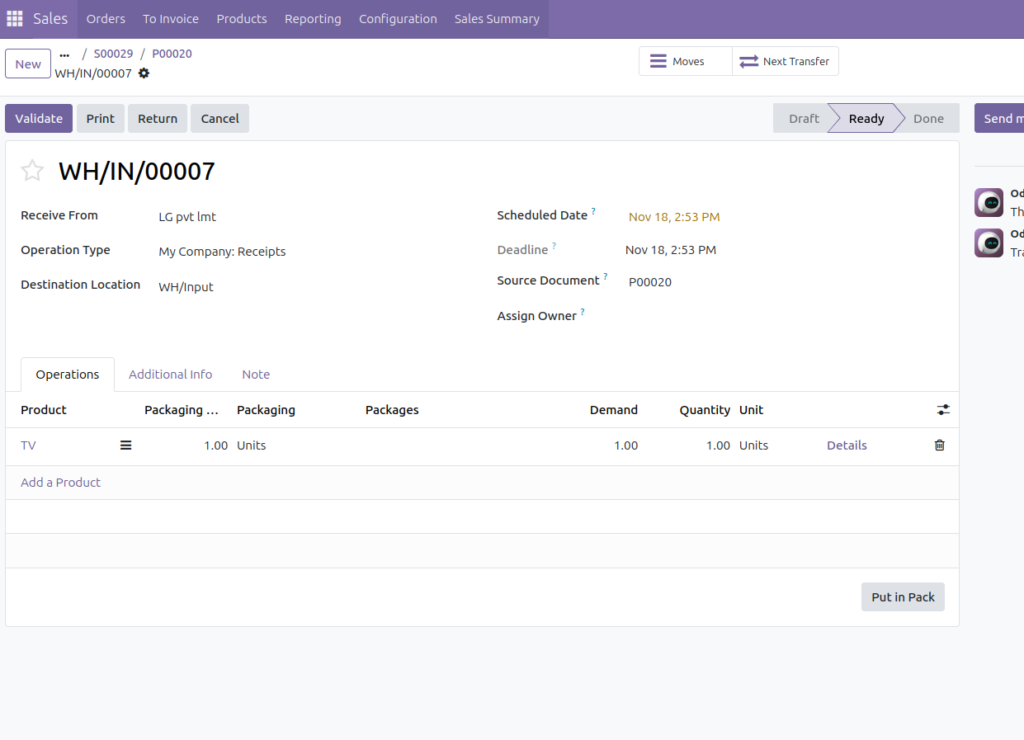 Figure 13. Receive the purchased TV into WH/Input.
Once the receipt is processed, Odoo can make the product available for the next movement defined by the Cross-Dock route. The transfer list is useful for checking whether the cross-dock and delivery operations are waiting for another operation or ready to process.
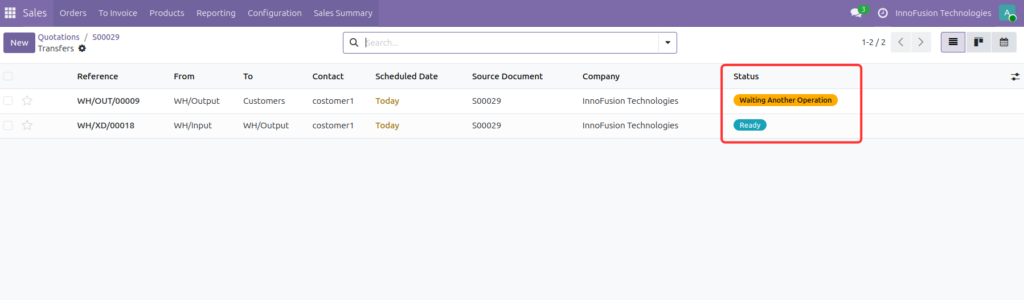 Figure 14. Check the transfer statuses after the inbound receipt is created.
8. Validate the Cross-Dock Transfer
Open the transfer with operation type Cross Dock. In the example, the transfer reference is WH/XD/00018, with source location WH/Input and destination location WH/Output. Check that the demanded and processed quantities match, then validate the transfer.
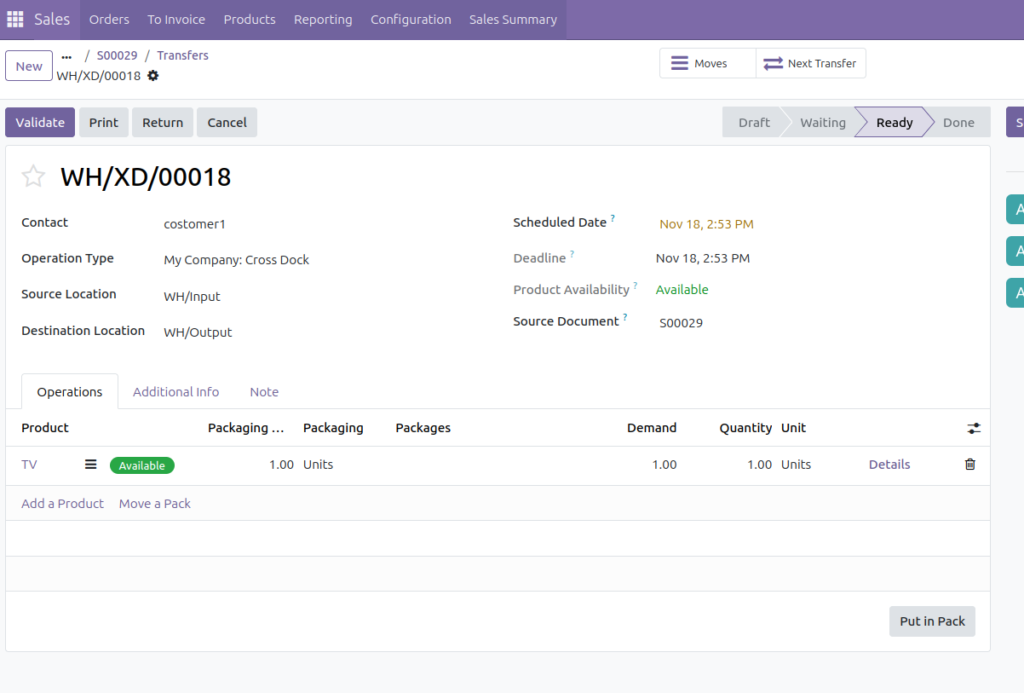 Figure 15. Review the Cross Dock transfer from WH/Input to WH/Output.
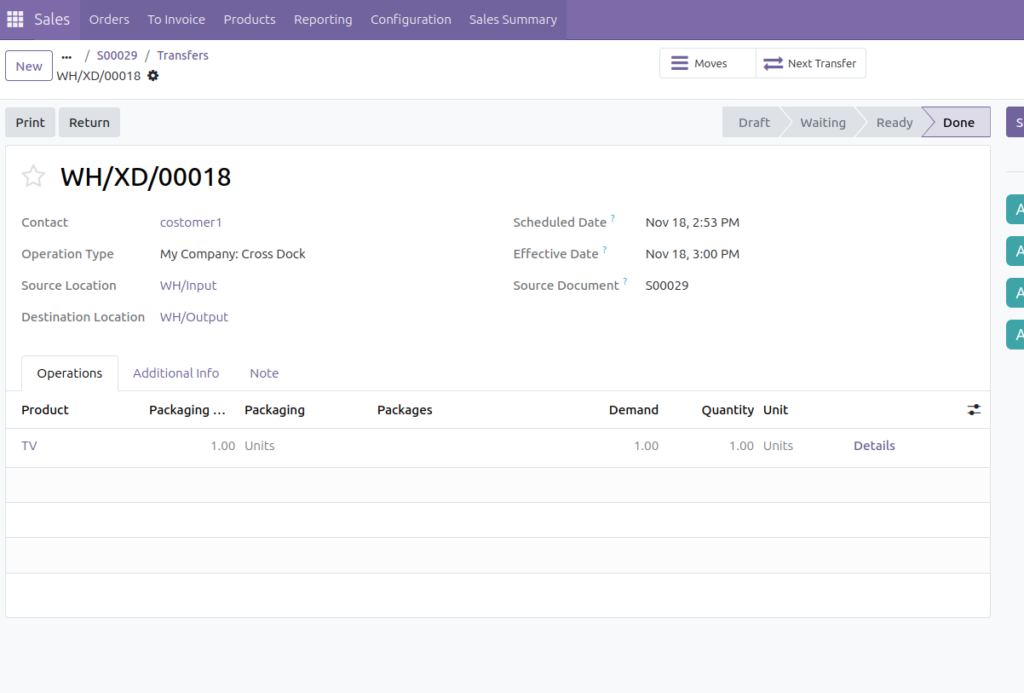 Figure 16. Validate the Cross Dock transfer after confirming product availability.
After validation, the cross-dock transfer is marked Done. The transfer list provides an overview of the cross-dock and delivery statuses linked to the same Sales Order.
 Figure 17. Review the updated transfer list and operation statuses.
9. Complete the Customer Delivery
Open the outgoing delivery. Its source location is WH/Output and its destination is Customers. Once the product is available and the delivery is ready, validate the delivery to complete the order fulfilment process.
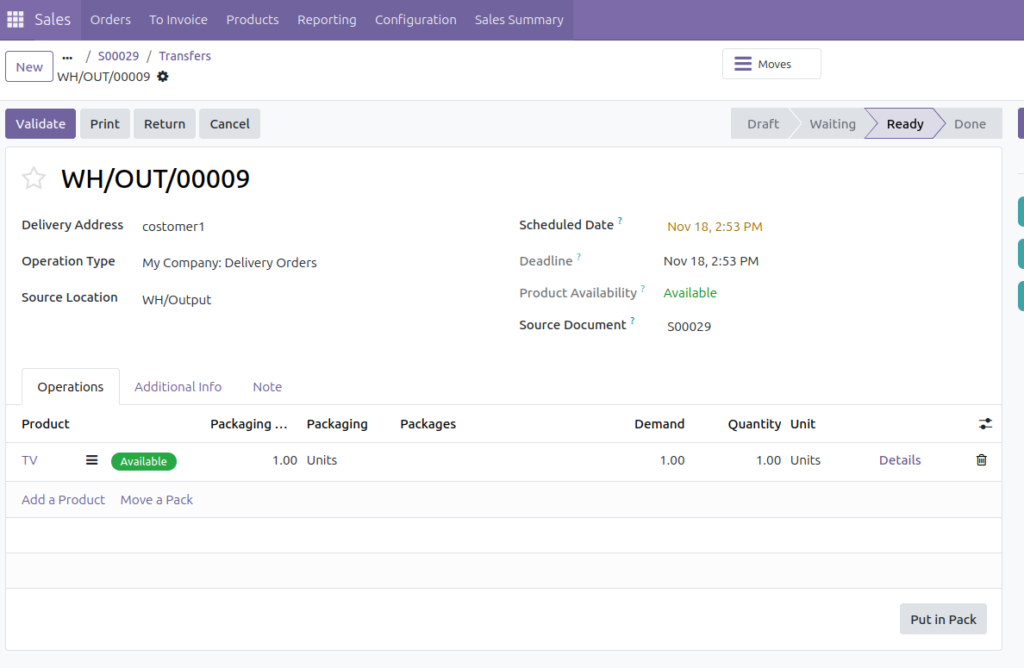 Figure 18. Review the outgoing delivery from WH/Output to the customer.
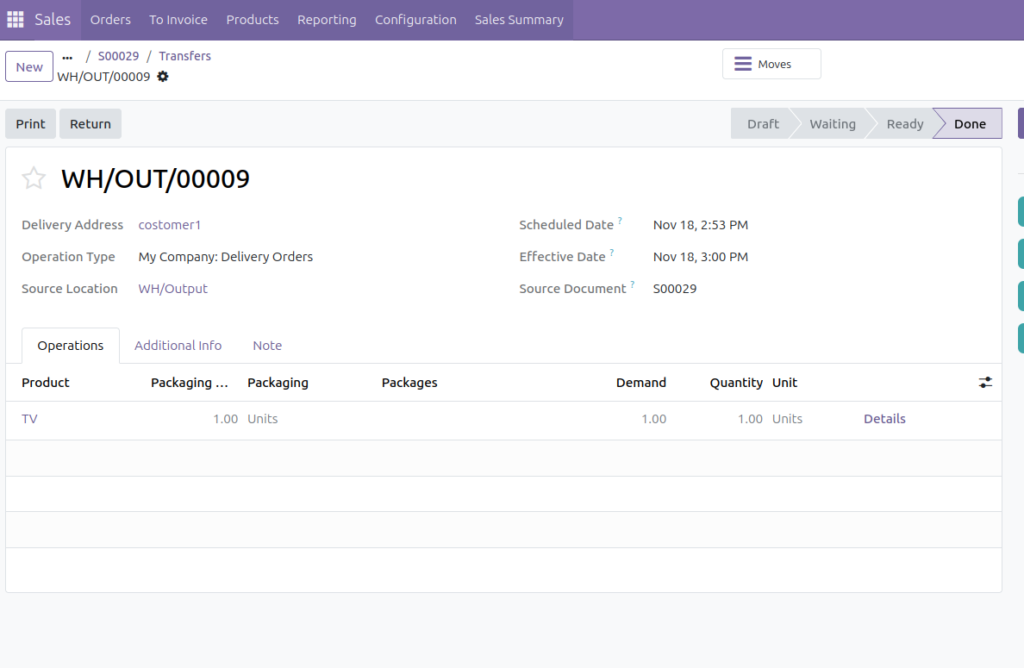 Figure 19. Validate the customer delivery.
 Figure 20. Confirm that the cross-dock and delivery transfers are completed.
What the Example Demonstrates
The completed workflow connects customer demand with purchasing and warehouse execution:
- A customer order is confirmed for one TV.
- Odoo creates the purchasing requirement using the Buy route.
- The vendor’s product is received into WH/Input.
- The Cross-Dock rule moves the product from WH/Input to WH/Output.
- The outgoing delivery moves the product from WH/Output to the customer.
The screenshots show the internal cross-dock transfer and the customer delivery as separate operations. This gives warehouse staff clear control over receiving, staging and dispatch.
Practical Checks and Common Mistakes
- Check route availability: make sure the Cross-Dock route exists and is applicable to the product or product category.
- Review stock rules: verify the source location, destination location, action and operation type for each rule.
- Avoid duplicate rules: inspect existing rules before adding another Input-to-Output rule.
- Check the vendor: the Buy route requires a valid vendor configuration for the product.
- Check operation dependencies: a delivery may show Waiting Another Operation until the preceding transfer makes the product available.
- Validate quantities: ensure the received, transferred and delivered quantities match the Sales Order demand.
- Test with a controlled example: use a small quantity and verify each generated operation before applying the route to live warehouse operations.
Frequently Asked Questions
What is cross-docking in Odoo?
It is a warehouse flow that transfers incoming products from a receiving location towards an outgoing dispatch location, instead of putting them away in the main stock location first.
Which locations are used in this example?
WH/Input, WH/Output and Customers. The key internal movement is WH/Input to WH/Output.
Why does the delivery show Waiting Another Operation?
The delivery depends on the preceding stock movement. It becomes ready when the required product is available at its source location and the dependency is completed.
Does cross-docking mean a business no longer needs warehouse storage?
No. It is an option for goods that are already needed for outgoing demand. Other products can continue to use normal storage and replenishment flows.
Should I create two identical Input-to-Output rules?
Not without checking the existing configuration. The supplied route screenshot shows two rules with the same displayed source and destination, so review the actual rule details and intended behavior before reproducing it.
Conclusion
Cross-docking helps businesses move products from receiving to dispatch with fewer unnecessary storage steps. In this Odoo 19 example, the Cross-Dock route connects WH/Input to WH/Output, while the delivery operation moves the product from WH/Output to the customer. By configuring warehouse locations, reviewing route rules and testing the complete purchase-to-delivery flow, businesses can make inbound and outbound operations work together more efficiently.