
A till is more than a place to type in prices. Cashiers need to find items quickly, charge the right amount, take payment and hand over a receipt. Managers need to know how much cash should be in the drawer at the end of a shift and which products are really selling. Restaurants add another layer: tables, courses and orders that must reach the kitchen on time.
Odoo Point of Sale (POS) covers all of this in a single app. It opens in an ordinary browser, works for both shops and restaurants, and shares its data with the rest of Odoo, so a sale at the counter can feed stock, invoicing and reporting. This guide follows the complete cycle with real screenshots: preparing products, taking a sale, issuing receipts, running cash sessions and reading reports. Restaurant tools and a short troubleshooting list close the guide.
What Is Odoo Point of Sale?
Odoo POS is the screen your staff use at the counter or the table. They pick products, build an order, choose how the customer pays and confirm it. Because POS belongs to the same system as Inventory, Accounting and Contacts, a finished order can also reach those apps, so nobody has to keep a separate stock sheet or re-type the day’s takings. How far that integration goes depends on the apps you have installed and on your settings.
Everything starts on the POS dashboard. Figure 1 shows a database with six registers, four of them visible: a furniture shop, a clothes shop, a bakery and a restaurant. Each card is one point of sale. A register with a running session shows Continue Selling together with its opening amount and the sales so far (the Furniture Shop card reads $170.90 across 3 orders), while a register without an open session, like the Bakery Shop, offers Open Register. The top menu leads to Orders, Products, Reporting and Configuration.
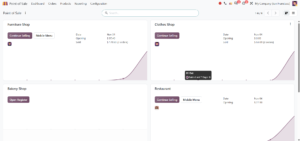
Figure 1: The Odoo POS dashboard with registers for a furniture shop, a clothes shop, a bakery and a restaurant, showing the Continue Selling and Open Register buttons.
Who Can Use It?
- Clothing and footwear stores: sell items with size and colour options and scan barcodes at the till.
- Supermarkets and convenience stores: handle quick, repeated counter sales paid in cash or by card.
- Furniture and electronics shops: keep stock figures up to date and record lot or serial numbers where traceability matters.
- Restaurants, cafés and bakeries: manage tables, send orders to the kitchen, split bills and serve dine-in or takeaway customers.
- Businesses with several outlets: run one point of sale per outlet and compare their results from the dashboard.
How a POS Sale Works
Almost every sale follows the same path:
- The cashier opens the register and confirms the starting cash, if cash control is switched on.
- Products are added by tapping their tiles or scanning their barcodes.
- The cashier changes quantities, attaches a customer when needed and applies any discount they are allowed to give.
- The customer picks a payment method and the cashier validates the payment.
- The receipt is printed, emailed or texted, depending on the setup.
- At the end of the shift the cash is counted and the session is closed.
A session is the period between opening and closing a register. Everything sold in that window is grouped together, which is what lets a manager compare the cash that should be in the drawer with the cash that was actually counted.
Setting Up Odoo POS
Before the first sale, shape the point of sale around the way the business actually runs. The onboarding screens differ slightly between databases and installed apps, so treat the steps below as a checklist rather than a fixed wizard.
Step 1: Create a point of sale
From the Configuration menu, create a new point of sale or edit an existing one, and give it a name your staff will recognise, such as Main Store, Bakery Shop or Restaurant. Each point of sale gets its own dashboard card , its own settings and its own sessions.
Step 2: Prepare the products
A product only shows up in the register once it is flagged for POS. Open the product form, for example from Inventory – Products, and tick the Point of Sale checkbox under the product name, highlighted in red in Figure 2. The same form holds the details a cashier relies on: product type, sales price, taxes, category and barcode. In the example, the Conference Chair sells for $33.00 plus 15% tax, which gives the $37.95 you will see at the register later in this guide.
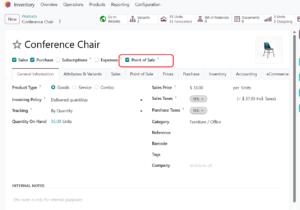
Note that the Barcode field is empty on this sample product. A cashier could still find the chair by searching or tapping its tile, but scanning would not work until a barcode is entered. For a supermarket or any shop that scans, make sure every product or variant carries the right code.
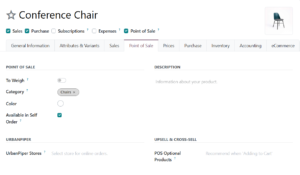
The Point of Sale tab (Figure 3) controls how the product behaves at the till:
- To Weigh: for items sold by weight with a connected scale.
- Category: the POS category that groups the product on the register (Chairs in this example).
- Color: an optional colour for the product tile.
- Available in Self Order: makes the product available to the self-ordering feature; it is ticked here.
- UrbanPiper Stores: links the product to stores used for online food-delivery orders.
- POS Optional Products: suggests add-ons when the item is added to the cart.
POS categories
POS categories sort the product grid into the coloured tiles shown above it on the register. Create and manage them under Point of Sale – Configuration – PoS Product Categories. Give each category a label, optionally pick a Parent Category to build a hierarchy (Drinks could contain Hot Beverages and Soft Drinks), choose a Color and add an image if you like. Then assign the category to each product in the Point of Sale tab (Figure 3). To show only some categories on a particular register, use the Restrict Categories field in the POS settings.
Product variants
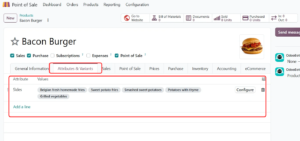
Variants let one product come in several options. Switch on the Variants setting in Inventory -> Configuration -> Settings (Products section) and save; the Inventory app is installed automatically together with Point of Sale. After that, open a product and add attributes and values in its Attributes & Variants tab.
Figure 4 shows a Bacon Burger with a Sides attribute that has five values: Belgian fresh homemade fries, sweet potato fries, smashed sweet potatoes, potatoes with thyme and grilled vegetables. A clothing store would do exactly the same with Size and Colour, and the furniture example used later in this guide relies on a Legs attribute with steel and aluminium options.
Product combos
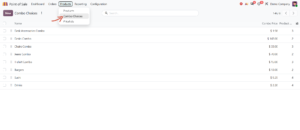
A combo sells several choices as one product, such as a burger, a side and a drink. It is built in two steps. First, create the combo choices, the groups a customer picks from. Open Point of Sale -Products -> Combo Choices (Figure 5) and click New, then:
- Enter a name for the combo choice.
- Use Maximum items to set the most items a customer may take from this choice.
- Use Includes items to set how many items the base price already covers.
- In a multi-company database, pick the Company, or leave it empty to make the choice available to all companies.
- Click Add a line under Options and add the products customers can choose from.
- If a product deserves a surcharge, click it and enter an Extra Price.
Second, create the combo product itself: go to Point of Sale -> Products -> Products, click New, enter a name, set Product Type to Combo, select the combo choices, add a Sales Price and, if wanted, pick a category in the Point of Sale tab.
On pricing: the Combo Price column in Figure 5 is the amount charged for every extra pick beyond the included items, while an Extra Price adds a surcharge for one particular item. In this demo list the Chairs Combo shows $33.00, the same as the Conference Chair’s sales price in Figure 2; Odoo’s documentation explains that this value follows the cheapest product in the choice.
Step 3: Configure payment methods
Decide how customers may pay. The payment screen in Figure 11 offers Cash, Card and Customer Account. Cash needs no extra equipment. Card payments through an integrated terminal need a supported provider, compatible hardware and a country-specific integration. Customer Account lets a registered customer pay later; this is why some contacts in Figure 10 show a Total due. Create methods under Point of Sale ->Configuration -> Payment Methods, then add them to the Payment Methods list in the POS settings.
Step 4: Configure receipts and hardware
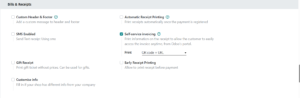
Receipt options sit in Point of Sale -> Configuration -> Settings, in the Bills & Receipts section (Figure 6). The options visible in the screenshot are:
- Custom Header & Footer: adds your own message at the top and bottom of the receipt.
- Automatic Receipt Printing: prints the receipt as soon as the payment is registered.
- SMS Enabled: sends a text receipt. If the WhatsApp app is installed, a WhatsApp Enabled option appears as well, and a Receipt template can be chosen for these messages.
- Self-service invoicing: prints information on the receipt so customers can request their invoice later. It is ticked here, with the Print field set to QR code + URL.
- Gift Receipt: prints a ticket without prices. Odoo 19 labels this option Basic Receipt.
- Early Receipt Printing: allows a receipt to be printed before payment, which is handy in restaurants.
- Customise info: lets a shop show contact details that differ from the company’s.
A receipt normally shows the company logo, the receipt and order numbers, the header and footer, the cashier and the customer (if one was set), the order lines with discounts, prices and payment methods, and optionally a QR code or link for requesting an invoice.
On the hardware side, Odoo POS can work with receipt printers, barcode scanners, customer displays, cash drawers, scales and payment terminals. Compatibility depends on the exact device and how it connects, and Bluetooth printers are not supported. Some network printers (ePOS models) can talk to the browser directly through Local Network Access (LNA), a browser permission that must be granted; such printers should be given a static IP address. The LNA button visible in Figure 14 shows the current permission status.
Step 5: Set up employees and permissions
Give cashiers the access they need to sell, and keep configuration, price changes and refund approval for managers. Odoo documents a Price Control option in the Pricing section of the POS settings that limits price editing in the register to POS administrators; check that it exists in your version. Review access levels before the whole team starts using the register.
Processing a Sale at the POS Register
From the dashboard, click Open Register (or Continue Selling if a session is already running). When cash control is enabled, an opening window asks for the starting cash first; it is covered in the sessions section below.
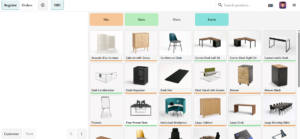
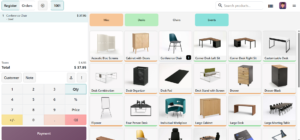
Figure 7 shows the register. The right side holds the category tiles (Misc, Desks, Chairs and Events), a search box and a barcode button above the product grid. The left side holds the current order, with the Customer and Note buttons underneath. The top bar has the Register and Orders buttons, a plus button to start another order and a tab with the order number, 1001 here. Misc, Desks and Events tiles carry a colour, while Chairs appears without one.
Tapping a product that has variants opens a selection window first. In Figure 8 the Conference Chair is listed at $37.95 with its internal reference E-COM12, the stock line reads Free To Use: 26 Units, and the Legs attribute offers Steel (selected) or Aluminium, which adds $6.40. Click Add to put the chair in the order, or Discard to cancel.
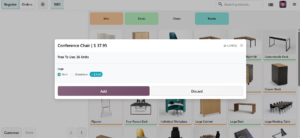
Figure 9 shows the result: one Conference Chair in steel for $37.95. Taxes of $4.95 are already contained in that total because the product price includes tax (15% of $33.00). The keypad changes the selected line: Qty sets the quantity, % applies a discount and Price overrides the unit price. Use the last two only if your role and company policy allow it.
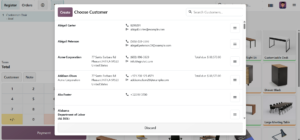
Click Customer to link the sale to a buyer. The Choose Customer window (Figure 10) lists contacts with their phone numbers and email addresses, and offers a search box and a Create button for new customers. A sale can go through without a customer, but a customer is needed for an invoice and is useful for purchase history, loyalty points and customer-specific pricing.
Click Payment to move to the payment screen (Figure 11). The method buttons are on the left, followed by Customer and Invoice buttons and a keypad with +10, +20 and +50 shortcuts for cash. The amount due, $37.95, is displayed in large digits on the right. Choose the method, enter the amount if the screen asks for it and validate. To issue an invoice, a customer must be set and Invoice must be switched on before validating.
Figure 11: The payment screen with the Cash, Card and Customer Account methods, the Customer and Invoice buttons and an amount due of $37.95.
Receipts, reprints and invoices
Once the payment is complete, the receipt screen lets the cashier print the receipt (the button is called Print Full Receipt in Odoo 19 and simply Print in the Odoo 20 documentation), or send it by email, SMS or WhatsApp by typing the customer’s address or number and clicking the matching icon. To reprint an old receipt, click Orders in the register, change the filter next to the search bar to Paid, select the order and click Print Receipt.
Invoices created at the till are found later under Point of Sale ‣ Orders ‣ Orders: open the order and use its Invoice smart button. If self-service invoicing is on, customers can scan the receipt’s QR code or type its link, fill in the ticket number, date and unique code printed on the receipt, and request the invoice themselves.
Customers, Discounts and Pricelists
Pricelists give different customer groups or sales situations their own prices. Figure 12 shows the list under Point of Sale ‣ Products ‣ Pricelists: VIP (USD), Regular (EUR), Professional Prices (USD) and Special (EUR), with columns for country groups, currency and whether each one is selectable. VIP and Regular are marked as selectable.
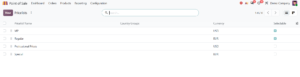
To use them, enable Flexible Pricelists in the Pricing section of the POS settings and save. After the page reloads, open Pricelists to define the rules, then return to the settings, add the pricelists to the Available field and choose a Default. A pricelist can also be attached to a customer under Point of Sale ‣ Orders ‣ Customers, in the Sales & Purchase tab.
Discounts and loyalty programs serve a different purpose. Pricelists hold structured pricing rules, while discount and loyalty programs suit promotions, seasonal offers and customer rewards. Configure the programs you plan to use before the cashiers need them, and keep manual discounts and price overrides limited to authorised staff.
Inventory and Stock Tracking
Because POS runs on Odoo Inventory, sold products can reduce stock. The product form in Figure 2 shows what to watch: the Conference Chair has 55 units on hand and 53 forecast, and its Tracking field is set to By Quantity. Businesses that need traceability can switch tracking to lots or serial numbers. The register itself also displays availability, as the 26 free units in Figure 8 show. When exactly stock moves are created depends on your POS and inventory configuration.
Keep product records, units of measure, barcodes, variants and warehouse settings accurate. A POS does not replace good stock discipline: supplier receipts, internal transfers, returns and stock adjustments still have to be handled correctly in Inventory.
Opening and Closing a POS Session
Opening the register
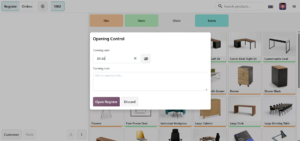
When cash control is on, opening a register brings up the Opening Control window (Figure 13). Enter the cash placed in the drawer (89.44 in the screenshot), add an optional opening note and click Open Register. The amount should match the money really in the drawer, because it becomes the starting point for the closing check.
During the day
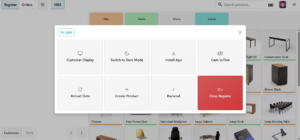
Money taken out of or added to the drawer, for example paying a supplier from the till, should be recorded with Cash In/Out and a reason. The button is in the register menu (Figure 14) and in the closing window, and requires the right access level.
Closing the register
Click the menu icon in the top-right corner of the register. Figure 14 shows its buttons: Customer Display, Switch to Dark Mode, Install App, Cash In/Out, Reload Data, Create Product, Backend (back to the regular Odoo interface) and the red Close Register. The LNA button in the top-left corner shows the Local Network Access status mentioned earlier.
Clicking Close Register opens the closing window (Figure 15). For each payment method it shows the expected amount, the counted amount and the difference. In the example, cash starts at $89.44, cash payments add $135.70 and cash in/out adds nothing, giving an expected $225.14. The counted amount typed in Cash Count is also $225.14, so the difference is $0.00. Card and Customer Account show $0.00. Add a closing note if needed, then click Close Register. The Daily Sale button offers a download of the day’s sales report.
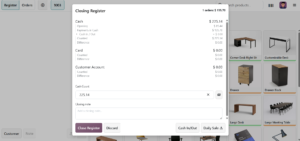
If the counted cash differs from the expected amount, review the cash in/out entries, the totals per payment method and the session’s orders before confirming. A manager should investigate any difference that cannot be explained. Closing sessions every day also makes it much easier to review sales and cash by register and date.
POS Reports and Sales Analysis
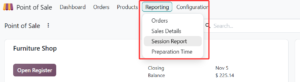
The Reporting menu (Figure 16) offers four entries: Orders, Sales Details, Session Report and Preparation Time. Together they let managers analyse orders and sales by product or payment method, review each session and, in restaurants, see how long preparation takes. Use them to spot best-sellers, compare trading periods and look into unusual transactions.
The dashboard also reflects closed sessions. In Figure 16 the Furniture Shop card has switched back to Open Register and shows the closing date and a balance of $225.14, the same cash total that appeared in the closing window.
Features for Retail Shops
- Barcode scanning: scanning adds the matching item to the order and cuts down on searching and typing errors, as long as the barcode is on the right product or variant.
- Variants: size, colour or any other attribute can be chosen at the till, as in Figures 4 and 8.
- Customer display and receipt printer: a screen facing the customer and a printer speed up checkout when compatible hardware is set up. The Customer Display option is in the register menu (Figure 14).
- Quotations and ship later: depending on configuration, a retail POS can prepare quotations or arrange delivery for later. Check which options are enabled in your database.
Features for Restaurants and Cafes
In restaurant mode the register works with floors, tables and open orders, so staff always know which table an order belongs to and can coordinate with the kitchen. To choose what appears first, set Default Screen in the PoS Interface section of the POS settings to Tables (the floor plan) or Register.
Floors and tables
For a quick start, type a floor name in the Floors field under Floors & Tables Map in the POS settings and press Enter. For full control, go to Point of Sale ‣ Configuration ‣ Floor Plans and click New: enter a floor name, choose the related point of sale, optionally add a background image, and add one line per table with its number, seats and shape. The settings icon on a table adds height, width, colour and an Active checkbox. Floors can also be edited visually from the register’s floor plan view.
Taking orders and notifying the kitchen
Add products to the cart, then either click Set Table and enter a table number, or click Set Tab and type a name for an open order. Click Send to confirm the order (earlier versions call this button Order), and take payment when the guests are ready. A New Order button creates an order that is not tied to a table.
To send orders to a kitchen or bar printer, open the POS settings and:
- Enable Preparation Printers in the Preparation section.
- Type the printer’s name in the Printers field and click Create and edit.
- Pick the Printer Type: a printer connected through an IoT system, or an Epson printer reached by its IP address.
- Add the product categories that should print there under Printed Product Categories.
- Save the printer form and the POS settings.
A preparation display can replace printed tickets. Either way, product categories decide which station receives which item.
Courses
The Course button splits an order into courses that go to the kitchen one after another. Click Course, add the products, and repeat for each course. Sending the order fires the first course. When the table is ready for the next one, reopen the order from the floor plan or the Orders overview and click the fire button for the next course.
Moving guests to another table
Click the Actions icon in the register, choose Transfer/Merge and select the target table. An empty table receives the guests and their order; an occupied table merges both orders.
Splitting bills and printing the bill early
Enable Allow Bill Splitting under the Point of Sale section of Point of Sale ‣ Configuration ‣ Settings. Then click the Actions icon and choose Split, select at least one product, and pick Payment to pay for them directly, Split Order to create a sub-order or Transfer to move them to another table. Pay, click Continue and repeat for each guest. A split requires at least two products, and the sub-order must be paid before you return to the main order. If you enable Early Receipt Printing (Figure 6), the Actions menu can also print a bill before payment.
Dine-in, takeaway, tips and bookings
Presets or order types let you tell dine-in, takeaway and delivery apart, and tax treatment can differ between them depending on local rules and your setup. Tips can be switched on in the POS settings, although availability can depend on the country and the payment terminal. If you take reservations, the Booking option in the PoS Interface settings connects the register to the Appointments app.
Returns and Refunds
When a customer brings an item back, use the POS refund workflow instead of deleting or editing the original sale. Find the paid order in the Orders screen, choose the items being returned and process the refund by the available method; Odoo can also issue a gift card for the refunded amount. Once the return is validated, a credit note referencing the original receipt or invoice is generated. Keep a clear refund policy, and make sure staff know who may approve returns, refunds and price changes.
Can Odoo POS Work Without an Internet Connection?
Odoo POS is built to keep working through short network outages, but offline does not mean every feature is available. The register keeps using the data already loaded in the browser, and orders taken while offline are held locally and sent to the server once the connection returns. Anything that needs a live answer from the server, such as freshly created products or customers, or a payment that depends on an online provider, may not be available. Check this with your own devices and terminal before relying on it in a live store.
If a shop has frequent connection problems, decide which products and customers must be loaded at the start of each session, and teach staff what to do when the offline indicator appears.
Frequently Asked Questions
Can Odoo POS be used for both retail shops and restaurants?
Yes. The same app supports shop workflows such as barcode scanning and variants, and restaurant workflows such as floors, tables, preparation printing and bill splitting.
Does Odoo POS update inventory?
POS sales can be linked to Odoo Inventory so that stock movements follow the orders. The exact behaviour depends on your configuration.
Can I use a barcode scanner?
Yes, compatible scanners work. Check how the scanner connects and make sure each product or variant has the correct barcode.
Can Odoo POS accept card payments?
It can work with supported payment terminals and providers. Availability depends on the provider, the country, the terminal model and your configuration.
Can I manage several cashiers?
Yes. Employee access and permissions can be configured so staff operate the register while managers keep the administrative settings.
Is Odoo POS suitable for a supermarket?
It handles the core checkout flow: product selection, barcode scanning and payments. Before going live, validate your specific needs for scales, high-volume scanning, promotions, payment hardware and local fiscal requirements.
Conclusion
Odoo POS gives shops and restaurants one connected place for counter sales, payments, customers and stock. A clothing store can lean on variants and barcode scanning, a furniture shop on combos and pricelists, and a restaurant on tables and kitchen orders, while managers review sessions and sales without juggling separate systems.
The best setup starts from how your business really operates. Configure the products, payment methods, permissions, hardware and session controls, then rehearse a full day of sales, including a return and a cash closing, before you go live.
Official References
- Odoo 20, Point of Sale overview: https://www.odoo.com/documentation/20.0/applications/sales/point_of_sale.html
- Odoo 20, Restaurant features: https://www.odoo.com/documentation/20.0/applications/sales/point_of_sale/restaurant.html
- Odoo 20, Pricing features: https://www.odoo.com/documentation/20.0/applications/sales/point_of_sale/extra/pricing.html
- Odoo 19, Receipts: https://www.odoo.com/documentation/19.0/applications/sales/point_of_sale/use/receipts.html
- Odoo 19, Products, categories and combos: https://www.odoo.com/documentation/19.0/applications/sales/point_of_sale/products.html
- Odoo 19, Local Network Access: https://www.odoo.com/documentation/19.0/applications/sales/point_of_sale/hardware_network/pos_lna.html